Home » How to Apply Paint Protection Film: The Step-by-Step Guide for a Flawless Finish
Recent Posts
How to Apply Paint Protection Film: The Step-by-Step Guide for a Flawless Finish
Paint Protection Film (PPF) has become one of the most popular automotive accessories for vehicle owners who want to keep their cars looking showroom-fresh. Whether you’re a car enthusiast, a professional detailer, or someone who just invested in a new ride, understanding how to apply paint protection film correctly can save you money and protect your vehicle’s value for years to come.
The global paint protection film market was valued at over USD 1 billion in 2025 and is projected to grow at a compound annual growth rate of over 7% through 2032. This growth is driven by increasing demand for vehicle aesthetics, protection against environmental factors, and the rise of self-healing film technologies. But here’s the thing—buying high-quality PPF is only half the battle. The real magic happens during installation.
In this guide, we’ll walk you through exactly how to apply PPF like a pro. We’ll cover everything from surface preparation to final curing, so you can achieve that flawless, invisible protection that makes PPF worth every penny.
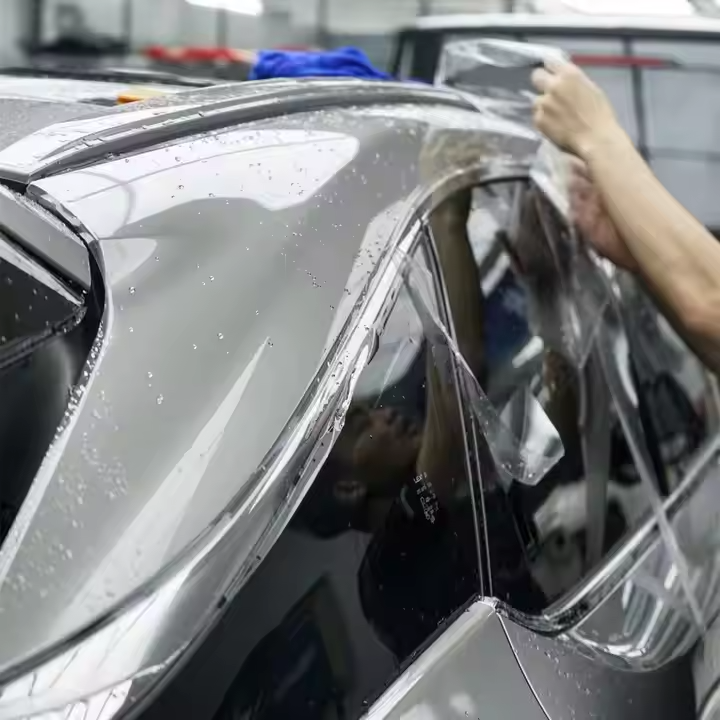
Table of Contents
What Is Paint Protection Film and Why Should You Care?
Before we dive into the how-to, let’s quickly cover what we’re working with. Paint Protection Film is a transparent, thin layer made from thermoplastic polyurethane (TPU) that adheres to your vehicle’s painted surfaces. Think of it as an invisible shield that takes the hits so your paint doesn’t have to.
Modern PPF offers some seriously impressive benefits:
Self-healing properties are probably the coolest feature. Minor scratches and swirl marks disappear when exposed to heat—whether from sunlight, warm water, or a heat gun. The film’s topcoat literally “heals” itself, maintaining that pristine look over time.
UV protection is another big one. PPF contains UV inhibitors that block harmful rays, preventing your paint from fading or oxidizing. Your car’s color stays vibrant longer.
Impact resistance means rock chips, road debris, and minor abrasions get absorbed by the film rather than your paint. It’s a physical barrier that takes the punishment so your factory finish doesn’t have to.
Chemical and stain resistance protects against bird droppings, tree sap, insect splatters, and environmental contaminants that can etch into clear coat.
Here’s the key distinction: ceramic coating protects against what lands on your paint, while PPF protects against what hits it. They serve different purposes, and many car owners actually use both for maximum protection.
Tools You’ll Need for PPF Installation
Before you even think about touching that film, make sure you’ve got all your tools ready. Nothing kills an installation faster than realizing you’re missing something halfway through.
Essential tools for PPF application:
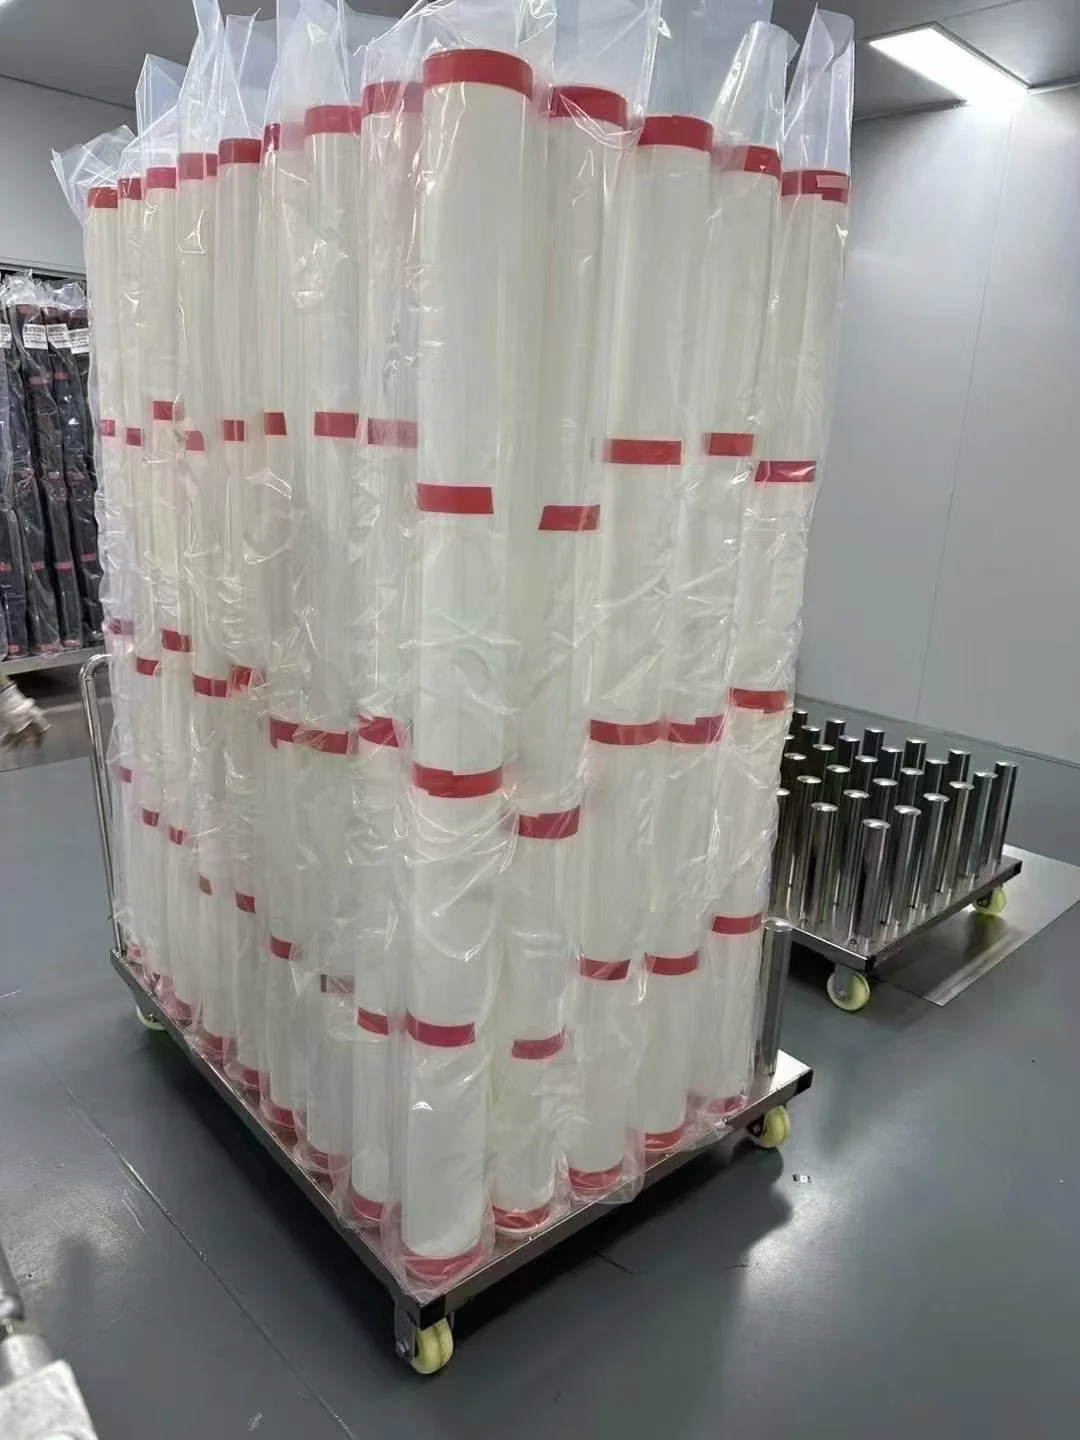
Paint Protection Film – obviously. Choose a high-quality film with good self-healing properties and UV protection. Decowell Film offers premium PPF options designed for durability and ease of installation.
Slip Solution – a mixture of distilled water and a few drops of baby shampoo or pH-neutral dish soap. This allows you to position the film without it sticking immediately. The typical ratio is about 2-3 ml of soap per liter of water.
Tack Solution – a mixture of isopropyl alcohol (70% or 99%) and distilled water. This helps lock the film down on edges and corners. A common ratio is 4-8 ounces of IPA per 32 ounces of water.
Spray Bottles – at least two, one for slip solution and one for tack solution.
Squeegees – various sizes for different panel shapes and curves.
Heat Gun – essential for stretching film around curves and activating self-healing properties.
Cutter Knife or Precision Blade – for trimming excess film. A sharp 30-degree blade works best.
Microfiber Towels – soft, lint-free towels for cleaning and drying.
Clay Bar or Clay Towel – for surface decontamination.
Isopropyl Alcohol (IPA) – for final surface degreasing.
Measuring Tape – for measuring panels before cutting.
Air Release Pen – for eliminating stubborn bubbles.
Having all these tools ready before you start will make the process smoother and reduce the chances of contamination or mistakes.
Step 1: Choose the Right Environment
The environment where you install PPF matters just as much as your technique. Professional installers work in clean, climate-controlled spaces for a reason.
Find a clean, well-lit garage or indoor space. Dust is the enemy of PPF installation—even tiny particles can cause bubbles or lifting. Work in a space where you can control airflow and keep dust to a minimum.
Temperature matters too. The ideal ambient temperature for PPF installation is between 18°C and 30°C (65°F to 86°F). If it’s too cold, the film won’t be flexible enough. Too hot, and the adhesive might activate too quickly.
Good lighting is non-negotiable. Inadequate lighting makes it extremely difficult to see contaminants, bubbles, or alignment issues. Set up bright, even lighting that covers all angles of the panel you’re working on.
Give yourself time. A full PPF installation can take anywhere from a few hours for a single panel to 15-25+ hours for a complete vehicle wrap. Don’t rush this process.
Step 2: Surface Preparation – The Make-or-Break Step
This is where most DIY installations go wrong. Proper surface preparation is absolutely critical for PPF adhesion and longevity. Even small dust particles can cause the film to bubble or lift after complete installation. Properly cleaned surfaces can reduce installation defects by as much as 50%.
2.1 Wash the Vehicle Thoroughly
Start with a thorough two-bucket wash using a high-quality car shampoo and a soft microfiber wash mitt. Remove all dirt, grime, and existing wax or sealants. Rinse thoroughly and make sure no soap residue remains.
2.2 Decontaminate with a Clay Bar
Even after washing, microscopic contaminants like tar, tree sap, or industrial fallout may remain. Use a detailing clay bar or clay towel with a lubricant to gently remove these embedded particles. This step ensures the surface is smooth and ready for the film to adhere properly.
2.3 Address Paint Imperfections
If you have scratches, swirl marks, or chips, now’s the time to fix them. Paint correction should happen before PPF installation, not after. Once the film is on, any imperfections underneath will be visible forever. Use a dual-action polisher with quality compounds to restore a smooth, clear surface.
2.4 Final Degreasing
This is the last and most important cleaning step. Mix a solution of 3/4 water and 1/4 isopropyl alcohol (or use a dedicated panel wipe) and thoroughly wipe down the surface. This removes any remaining oils, waxes, silicones, or fingerprints that could compromise adhesion.
Pro tip: After degreasing, use an air compressor to blow out loose debris from seams, edges, grilles, and tight spots. Dust hides in these areas and can work its way under the film during installation.
Step 3: Measure and Cut the Film
With your surface prepped and ready, it’s time to prepare the film.
Measure the panel carefully. Use measuring tape to get accurate dimensions of the area you’re covering. Leave a slight margin around the edges—about 1-2 inches of extra material—to ensure complete coverage and allow for trimming later.
Cut the film to size. Use a sharp cutter knife or precision scissors to cut the PPF. If you’re using a pre-cut kit, skip this step and move straight to application. For bulk film, take your time with cutting—accuracy here makes the rest of the process much easier.
Work in sections. Rather than trying to cover an entire panel at once, break it down into manageable sections. This is especially important for complex areas like bumpers with curves and contours.
Step 4: Apply the Film Using the Wet Method
The wet installation method is the industry standard for PPF application. It uses a slip solution to allow precise positioning before the film fully bonds to the surface.
4.1 Spray Slip Solution
Generously spray slip solution onto both the vehicle’s surface and the adhesive side of the PPF film. The film should be wet enough to slide around easily but not dripping.
Why this matters: The slip solution prevents the film from grabbing the surface immediately, giving you time to position it perfectly. Once you start squeegeeing, the solution gets pushed out and the adhesive makes contact.
4.2 Position the Film
Carefully place the film onto the wet panel. Align it with your reference points—edges, body lines, or seams. The film should be manageable and repositionable as long as it stays wet. Don’t be afraid to lift and reposition if something isn’t lined up correctly.
If you’re working alone, create a dry anchor point by squeegeeing a small section at one edge. This keeps the film from sliding around while you work on the rest.
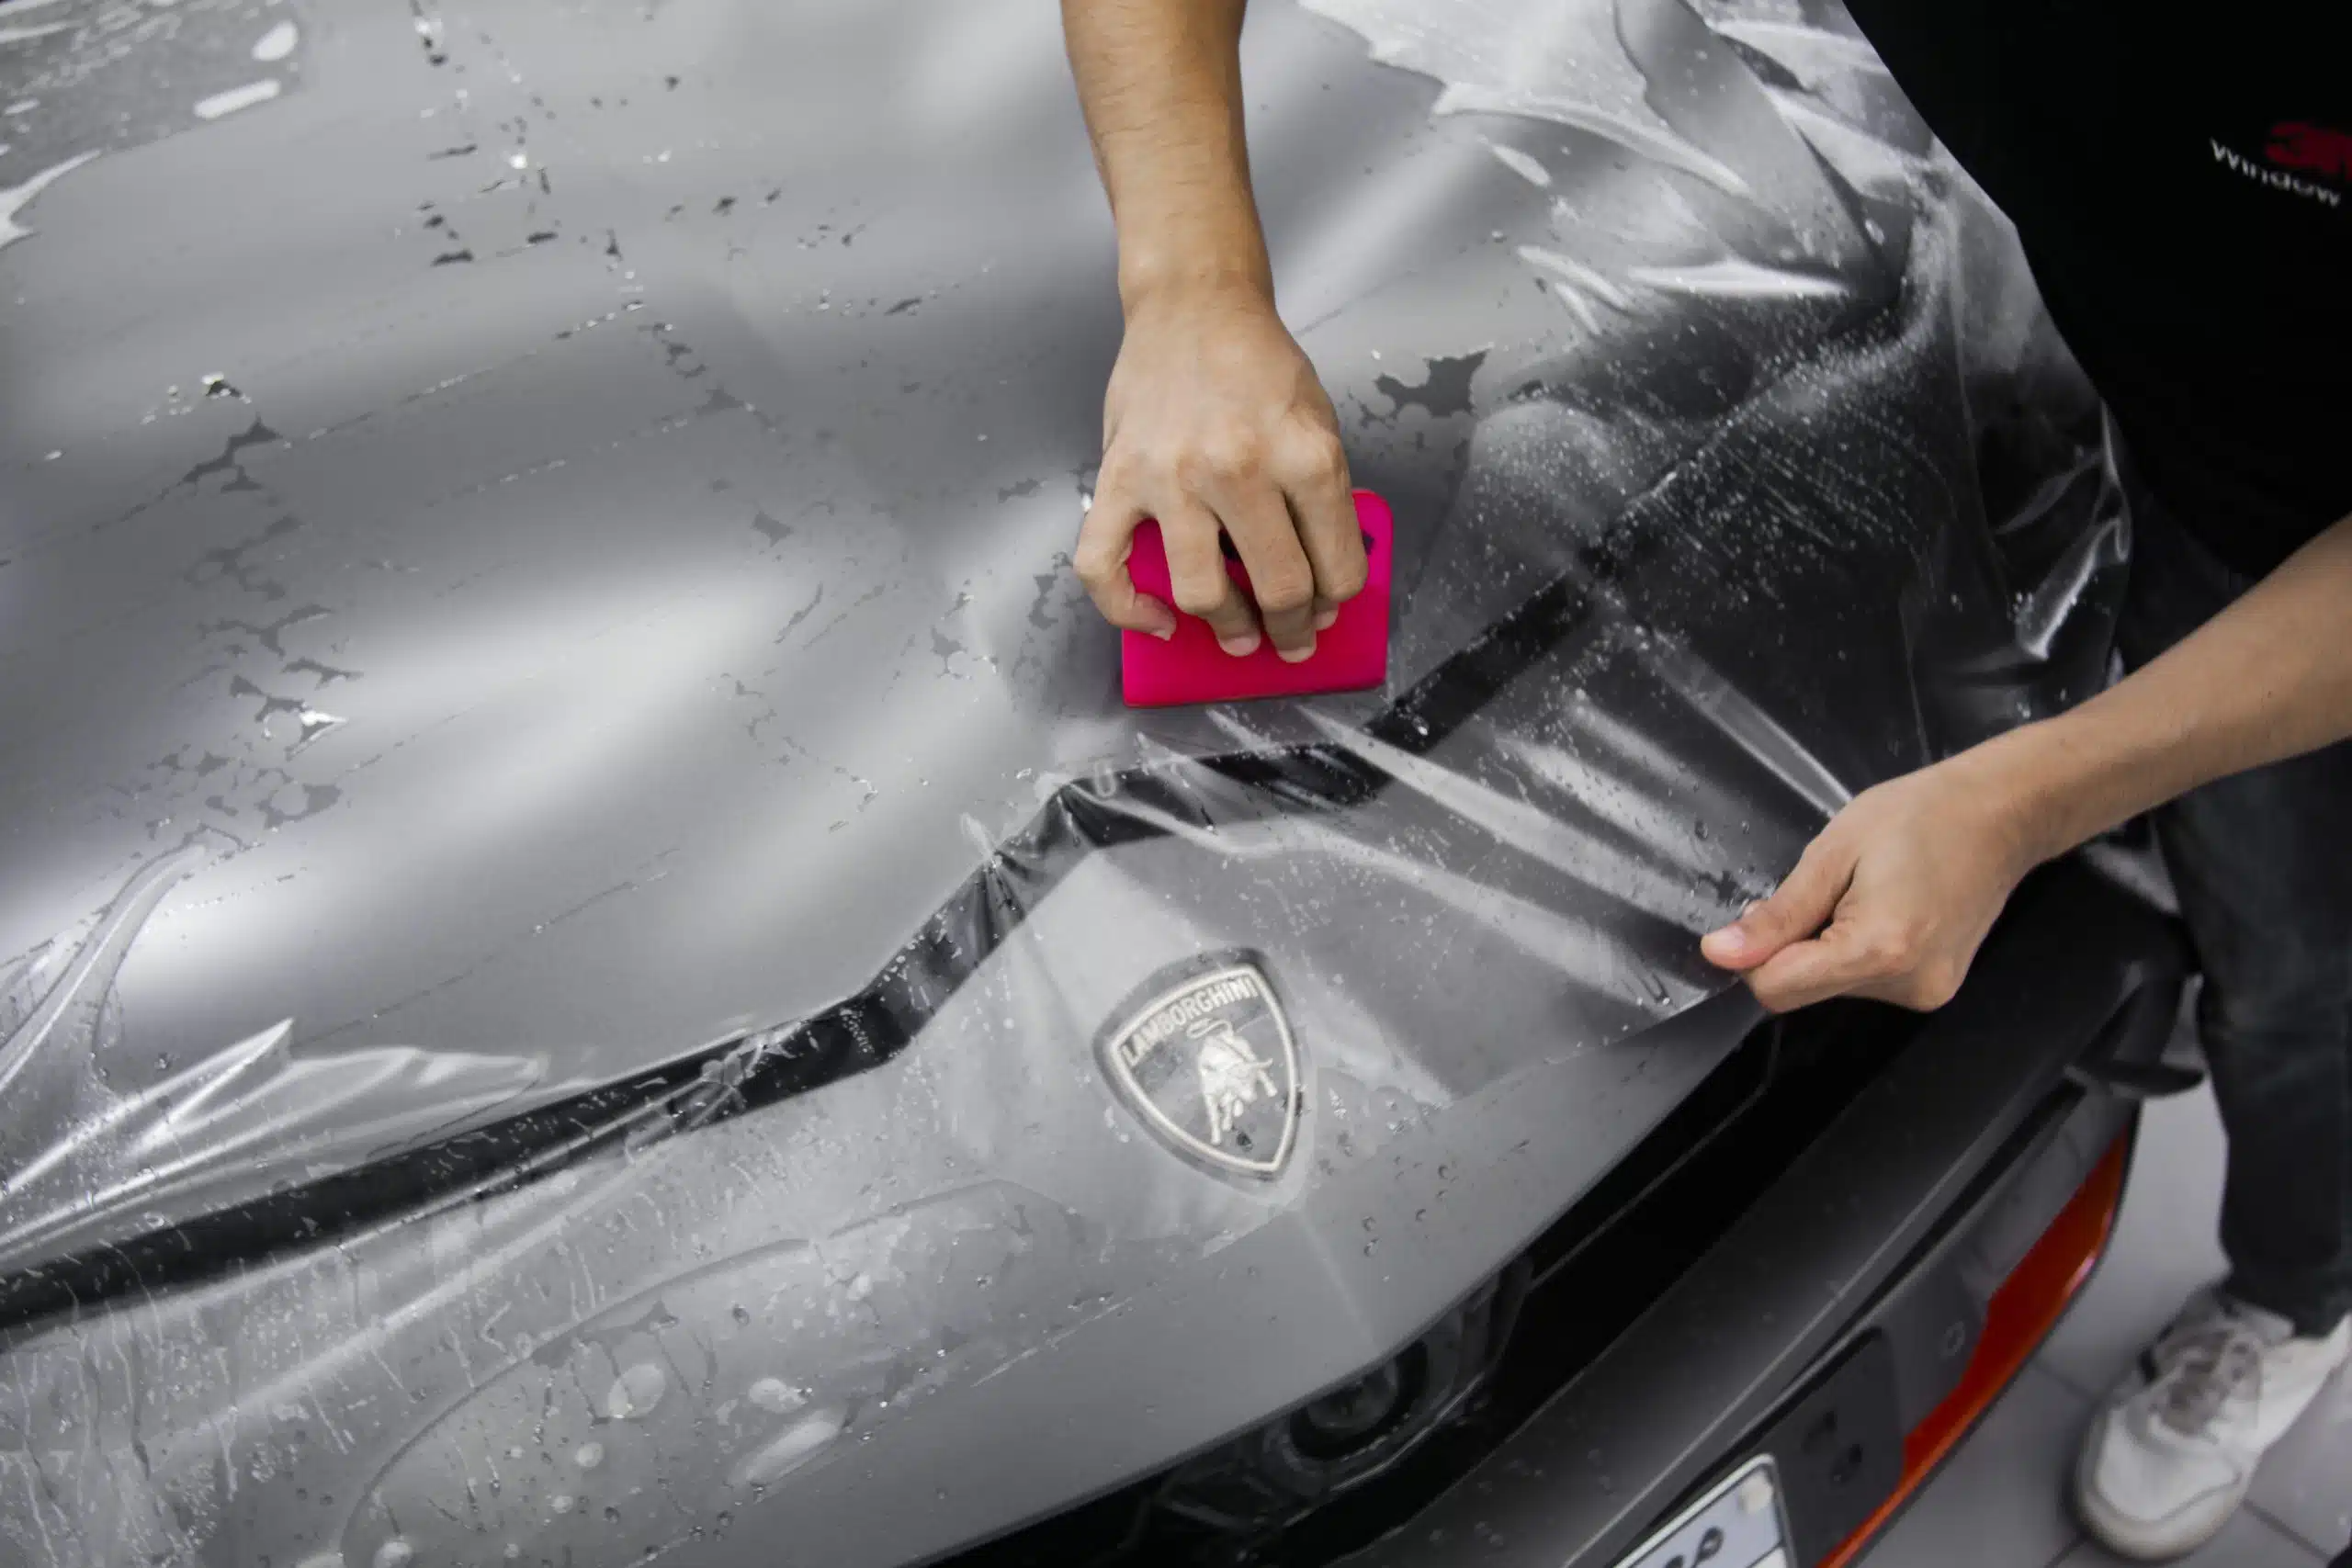
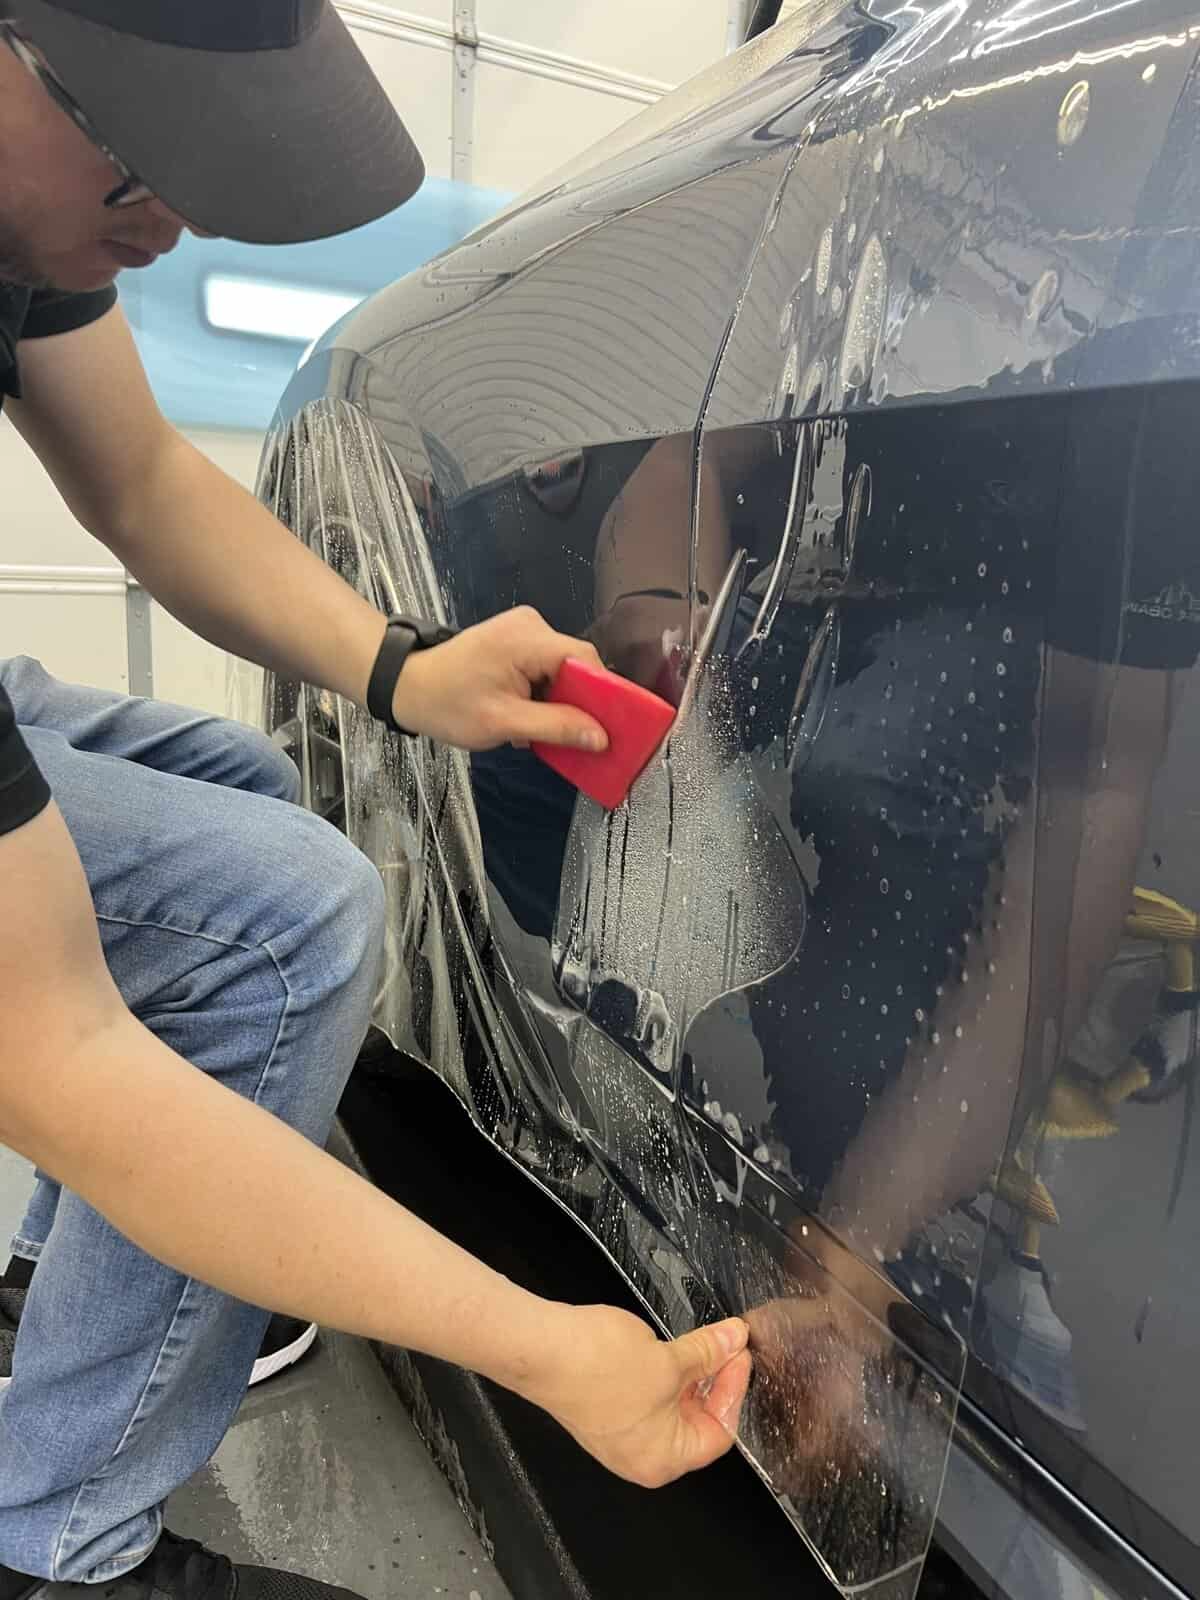
4.3 Squeegee from the Center Outward
This is where technique really matters. Starting from the center of the panel, use your squeegee to push solution and air outward toward the edges.
Key tips for squeegeeing:
Use overlapping strokes to ensure complete coverage
Apply firm, even pressure—not too hard, not too light
Work from top to bottom, center to edges
Keep the surface wet to prevent the squeegee from sticking
Wipe excess solution as you go with a microfiber towel
For curved surfaces, gently stretch the film as needed. Some PPF has natural elasticity that allows it to conform to curves without heat. If you’re dealing with complex curves, a bit of heat from a heat gun can make the film more pliable.
4.4 Use Tack Solution for Corners and Edges
Once the main panel is smoothed out, it’s time to lock down the edges. Lift each corner or edge slightly, spray tack solution underneath, and press it back down. This increases adhesion in critical areas and prevents edge lifting later.
Edge wrapping is an advanced technique where you fold the film around the edges of panels for a seamless, invisible finish. Heat the film gently, fold it over, and squeegee it down.

Step 5: Eliminate Bubbles and Wrinkles
Even with careful application, you might end up with some air bubbles or moisture pockets. Don’t panic—this is normal and fixable.
For small bubbles: Use an air release pen or fine needle to puncture the bubble gently. Press the air or moisture out with your finger or a small squeegee. The tiny hole will self-heal as the film cures.
For larger bubbles or wrinkles: You may need to lift that section of film, spray more slip solution, and re-squeegee. This is why it’s important not to use too much tack solution too early—it gives you flexibility to make corrections.
Prevention is better than cure. Most bubbles come from trapped dust, residue, or moisture. Thorough surface preparation and proper squeegee technique are your best defenses.
Step 6: Activate Self-Healing Properties
Once the film is applied and smoothed out, use a heat gun on a low setting to activate the self-healing properties. Hold the gun about 12-18 inches from the surface and move it evenly across the film. The heat helps the film settle into place, eliminates minor imperfections, and activates the healing cycle.
Don’t overheat. Too much heat can damage the film or over-activate the adhesive. Gentle, even heat is all you need.
Step 7: Let the Film Cure
Patience is the final step. The PPF needs time to bond properly with the surface.
Initial drying: Leave the vehicle for a few hours in a dry, sheltered place. The film will harden and form a protective shell over your paint.
Full curing: It typically takes about 48 hours for the film to cure completely and up to a week to set perfectly. During this time:
Don’t touch or disturb the film
Avoid washing the vehicle
Keep the car out of extreme weather conditions
Don’t drive the car if possible
Don’t worry about small bubbles you might see during curing—they usually disappear once the process is complete.
PPF Aftercare and Maintenance
Once your PPF is fully cured, proper maintenance will keep it looking great for years.
Hand wash only. Automated car washes with harsh brushes can damage the film. Use a mild, pH-balanced automotive shampoo and a soft microfiber wash mitt.
Dry thoroughly. Use a clean microfiber towel to dry the vehicle completely after washing. Don’t leave water spots on the film.
Clean contaminants promptly. Bird droppings, tree sap, and insect splatters should be removed as soon as possible. Soak the area with water or a PPF-safe cleaner to soften the contaminant, then gently wipe it away.
Avoid high-pressure washers near edges. High-pressure water can lift the edges of the film. If you must use a pressure washer, keep it at a safe distance and avoid direct blasts at film edges.
No waxing required. PPF doesn’t need waxing or sealing like regular paint. In fact, some waxes and sealants can damage the film.
Inspect periodically. Check the film for signs of damage, lifting edges, or discoloration. Address any issues promptly to prevent further problems.
Common PPF Installation Mistakes to Avoid
Even experienced installers make mistakes. Here are the most common ones and how to avoid them:
Mistake 1: Skipping surface preparation. This is the #1 cause of installation failure. Clean, clay, degrease—don’t skip any step.
Mistake 2: Not using enough slip solution. The film needs to be wet to slide into position. If it’s too dry, you’ll struggle with alignment and risk creasing the film.
Mistake 3: Overstretching the film. Stretching too much can thin the film, reduce its protective properties, and cause tension that leads to edge lifting.
Mistake 4: Rushing the process. PPF installation takes time. Rushing leads to misalignment, bubbles, and poor edge work.
Mistake 5: Ignoring environmental factors. Dust, temperature, and humidity all affect installation quality. Work in a controlled environment.
Mistake 6: Improper trimming. Leaving jagged edges or cutting too close to the panel edge can lead to peeling. Always leave a little extra material and trim carefully.
Mistake 7: Not using enough heat on curves. Curved panels and complex shapes need heat to conform properly. Under-heating can cause the film to shrink back or lift.
DIY vs. Professional Installation: What You Should Know
Can you install PPF yourself? Yes, absolutely. But there are some things you should know before diving in.
DIY PPF installation can save you money—kits typically range from $500 to $2,000 depending on coverage and film quality. But it requires patience, skill, and the right environment. The learning curve is steep, and mistakes can be costly. Your first attempt will likely show imperfections like bubbles, wrinkles, or improper edges.
Professional installation costs more—anywhere from $1,000+ for a front-end to $7,000+ for full vehicle coverage—but delivers a flawless, long-lasting finish with warranties and peace of mind.
Our recommendation: If you’re doing small sections like door edges, mirrors, or headlights, DIY is totally doable. For full hoods, bumpers, or complete wraps, consider professional installation—or at least practice on smaller areas first.
Why Choose Decowell Film for Your PPF Needs
When it comes to paint protection film, quality matters. Decowell Film offers premium PPF solutions designed for durability, clarity, and ease of installation.
Superior self-healing technology means minor scratches and swirl marks disappear with heat exposure, keeping your vehicle looking flawless.
Excellent UV protection preserves your paint’s color and prevents fading over time.
High optical clarity ensures the film is virtually invisible once installed—your car’s original color and finish shine through.
Durable construction provides long-lasting protection against rock chips, road debris, and environmental contaminants.
Easy installation with the right slip and tack solutions makes the application process smoother, whether you’re a professional or a dedicated DIYer.
Decowell Film is engineered for vehicle owners who demand the best protection without compromising aesthetics. Whether you’re protecting a daily driver, a weekend toy, or a show car, Decowell Film delivers the performance you need.
Ready to protect your investment? Contact Decowell Film today to learn more about our premium paint protection film options. Our team can help you choose the right product for your vehicle and provide expert guidance on installation.
Frequently Asked Questions
Q: How long does it take to install PPF on a full car?
A: A full vehicle PPF installation typically takes 15-25+ hours for professionals. For DIYers, expect to spend significantly more time, especially on your first attempt. Single panels like hoods or bumpers usually take 2-4 hours.
Q: Can I install PPF myself, or should I hire a professional?
A: You can absolutely install PPF yourself, especially on smaller sections. However, full wraps or complex panels are best left to professionals who have the experience, tools, and controlled environment needed for flawless results.
Q: How long does PPF last?
A: High-quality PPF typically lasts between 5 and 10 years with proper care and maintenance. The lifespan depends on film quality, environmental exposure, and how well you maintain it.
Q: Will PPF damage my paint when removed?
A: No, when removed properly, PPF won’t damage factory paint. In fact, it helps preserve it by protecting against scratches, chips, and UV damage. Just avoid cheap films or poor installations that may bond too aggressively.
Q: Can I wash my car right after PPF installation?
A: No. Wait at least 48 hours for the film to cure, and ideally a full week before washing. This gives the adhesive time to bond properly with the surface.
Q: Is PPF better than ceramic coating?
A: They serve different purposes. PPF offers physical protection against rock chips, scratches, and impacts—it’s a physical barrier. Ceramic coating enhances gloss, makes cleaning easier, and provides chemical resistance. Many car owners use both: PPF for impact protection and ceramic coating on top for extra gloss and ease of maintenance.
Q: Does PPF change the color of my car?
A: No. High-quality PPF is optically clear and virtually invisible when installed correctly. It preserves your car’s original color and finish.
Q: Can PPF be applied to any vehicle?
A: Yes, PPF can be applied to any vehicle—from daily drivers to luxury cars, sports cars, and even motorcycles. It can be applied to specific high-impact areas or the entire vehicle.
Q: How do I remove stubborn contaminants from PPF?
A: For bird droppings, tree sap, or bug splatters, soak the area with water or a PPF-safe cleaner to soften the contaminant, then gently wipe it away with a microfiber cloth. Avoid aggressive scrubbing.
Q: Does PPF require waxing?
A: No. PPF doesn’t require waxing or sealing like regular paint. In fact, some waxes and sealants can damage the film. Stick to pH-neutral car shampoos and PPF-safe cleaning products.
Final Thoughts
Learning how to apply paint protection film is a valuable skill that can save you money and keep your vehicle looking pristine for years. While the process requires patience, attention to detail, and the right techniques, the results are absolutely worth it.
Remember: preparation is everything. Take your time with surface cleaning and degreasing. Use the right solutions—slip for positioning, tack for edges. Squeegee from the center outward. Apply heat for curves and self-healing activation. And most importantly, let the film cure properly before exposing it to the elements.
Whether you’re a professional installer looking to expand your services or a car enthusiast taking on a DIY project, Decowell Film is here to support you with premium paint protection film products designed for excellence.
Protect your investment. Preserve your paint. Choose Decowell Film.
Ready to get started? Contact Decowell Film today for more information about our paint protection film products and installation support.