
Home » How to Apply Paint Protection Film Like a Pro: Step-by-Step Guide
Recent Posts
How to Apply Paint Protection Film Like a Pro: Step-by-Step Guide
If you’ve just dropped a chunk of change on a new ride—or you’re just crazy about keeping your current one looking sharp—you’ve probably heard about paint protection film (PPF). It’s that nearly invisible urethane shield that takes rock chips, bug splatter, and light scratches so your paint doesn’t have to. But here’s the honest truth most sales pages won’t tell you: how to apply paint protection film correctly is not forgiving. One rushed step, and you’re staring at bubbles, lifted edges, or worse—film that looks worse than the damage you were trying to prevent.
This guide walks you through the real process. No fluff, no marketing hype. Just what actually works, what usually goes wrong, and how to get a professional-level finish whether you’re trying a DIY job or want to understand what you’re paying a pro to do. And if you’re looking for film that actually makes installation easier without cutting corners on protection—we’ll get to that at the end.
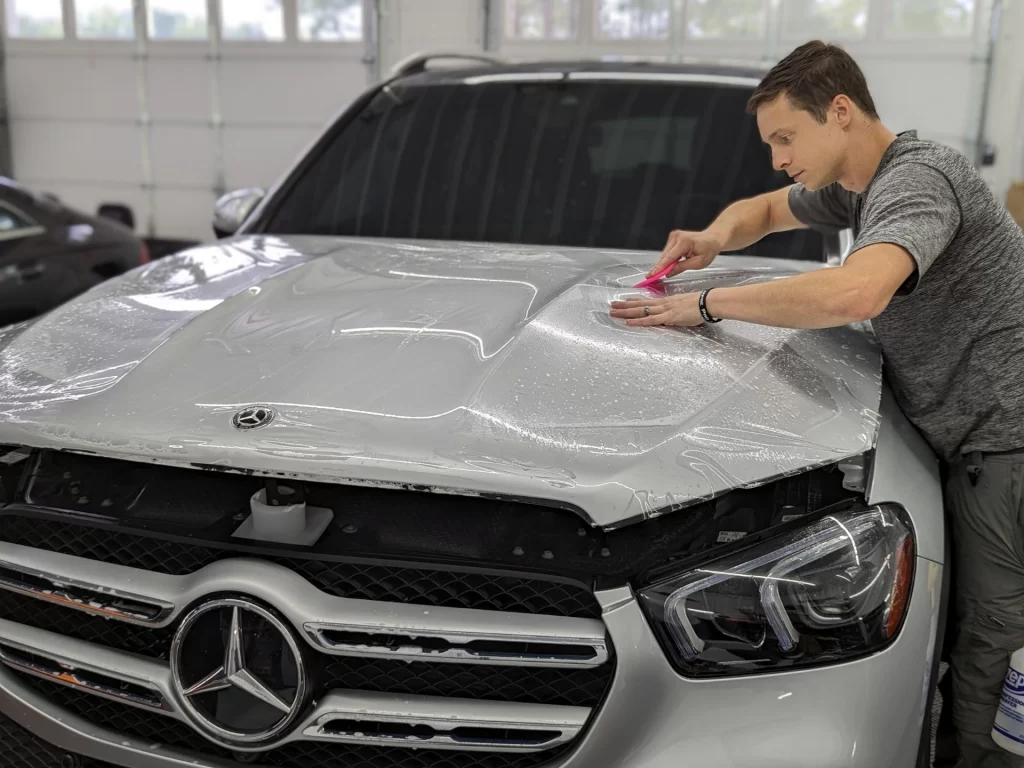
Table of Contents
Quick Takeaways: What You’re Getting Into
Before you peel a single backing liner, know this: proper surface preparation eats up about 80% of the total job time. The global paint protection films market was valued at USD 1.07 billion in 2025 and is projected to reach USD 1.77 billion by 2032, growing at a CAGR of 7.41%. That’s because more car owners are waking up to the fact that repainting costs way more than preventing damage in the first place. PPF saves your factory paint, which preserves resale value and keeps your car looking showroom-fresh for years.
But a great film in the wrong hands is just expensive plastic. How to apply paint protection film starts long before the film touches paint.
Step 1: Set Up Your Workspace Like a Pro
You need a clean, indoor space with consistent temperature. The sweet spot is 65–77°F (18–25°C). Too cold, the adhesive won’t bite properly. Too hot, the film gets too soft and sticky too fast, and you lose that precious window to reposition. Professional installers maintain temperatures around 70–79°F (21–26°C) for optimal application.
Dust is your enemy. Windy garages, open doors, or dirty floors will send tiny particles airborne—and they will land right on your adhesive side. Use bright white lighting so you can spot every speck of dust before it gets sealed under the film. If you can set up positive-pressure airflow with filtered intake, even better. That’s what the top shops do.
Step 2: The Right Tools Matter—Don’t Cheap Out
You wouldn’t build a house with a butter knife. Same logic applies here. Here’s what you actually need:
PPF film (obviously)—get quality TPU material, not cheap PVC
Two spray bottles—label one “Slip” (water + baby shampoo) and one “Tack” (water + isopropyl alcohol)
Soft squeegee with a wrapped felt edge (hard squeegees scratch)
Heat gun or infrared lamp (a hair dryer can work but takes forever)
Clay bar and iron remover for decontamination
Microfiber towels (lint-free, multiple)
Sharp 30-degree snap-off blade for trimming
Isopropyl alcohol (70% or higher) for final wipe-down
Nitrile gloves (fingerprints on adhesive are permanent)
Distilled water—tap water leaves mineral deposits
Professional shops use plotter cutters to pre-cut film to exact vehicle patterns, which saves hours and reduces waste. If you’re a DIYer, pre-cut kits designed for your specific car model are the way to go.
Step 3: Surface Prep—Where 80% of DIY Installs Fail
This step is boring, takes forever, and makes or breaks the whole job. Skip it or rush it, and you will have bubbles and lifting edges forever. Here’s the correct sequence:
First, chemical decontamination. Wash the entire vehicle with pH-neutral car shampoo to strip wax, sealants, and road grime. Follow immediately with an iron remover spray—you’ll see purple bleeding as it dissolves embedded metallic fallout (brake dust, industrial fallout, road salt residue). This is especially important if you live in areas with winter road salt.
Second, clay bar treatment. After chemical decon, work a clay bar across every painted surface using clay lubricant. The clay lifts embedded particles that washing can’t touch—tar, paint overspray, tree sap, industrial fallout. Before claying, the surface feels rough like sandpaper. After, it should feel like glass. Any grit left behind creates “dirt bubbles” that are trapped permanently once the film goes on. Those show up as small lumps and are considered installation defects.
Third, IPA panel wipe. Wipe down every panel with 10–15% isopropyl alcohol solution using a clean microfiber cloth. This removes any remaining oils, wax residue, or silicone from previous products. Pay extra attention to edges and crevices where contamination hides. Let it air dry completely before moving on.
Fourth (critical), check for paint imperfections. PPF does not hide swirls, scratches, or chips—it magnifies them. If you have visible imperfections in your clear coat, do paint correction before applying film. Use a dual-action polisher with fine-grit compound to smooth out swirl marks and restore clarity. Any flaw you seal under PPF becomes a permanent eyesore.
Final check: Run your bare hand over the surface. If you feel anything other than smooth, clean glass—go back and do it again.
Step 4: Mix Your Solutions Correctly
Slip solution and tack solution aren’t interchangeable. They do different jobs.
Slip solution (for initial positioning): Mix distilled water with 1.5–2 ml of baby shampoo (like Johnson’s) per 32 ounces of water. This lets the film float on the surface so you can slide it around without it grabbing prematurely. Spray liberally on both the vehicle panel and the adhesive side of the film.
Tack solution (for locking down): Mix 150 ml of 99% isopropyl alcohol with 850 ml of distilled water. Or use 250 ml of 70% isopropyl alcohol with 750 ml of distilled water. This dries faster and increases adhesion grip, perfect for edges and complex curves.
Hybrid solution (for general use): 2 ml baby shampoo plus 150 ml isopropyl alcohol (99%) plus 850 ml distilled water. This gives you some slip with faster drying than pure slip solution.
Pro tip: Mix fresh solutions daily. Don’t store them overnight—bacteria grows, ratios change, and old solution creates inconsistent results.
Step 5: Cutting and Alignment—Measure Twice, Cut Once
If you’re using a pre-cut kit, dry-fit each piece before peeling the liner. Hold it up against the panel to confirm it matches the contours. Pre-cut kits from reputable brands (like Decowell’s precision-cut templates) save enormous time and eliminate guesswork.
If you’re cutting from bulk roll: leave about 0.5–1 inch of extra material around all edges. You can trim excess later, but you can’t add material back. Use the vehicle’s natural body lines, panel gaps, and emblem placements as alignment guides.
For complex areas like bumpers and mirrors, consider using knifeless tape to create clean seam lines without risking paint cuts. Any knife work on paint carries risk—one slip and you’ve got a permanent scratch under your “protective” film.
Step 6: The Actual Application—This Is Where Patience Pays Off
Peel the backing liner carefully. Static electricity from peeling attracts dust. If you’re working in a glossy or metallic film, mist the surface of the film as you remove the cap sheet—this captures airborne dust particles attracted by static charge.
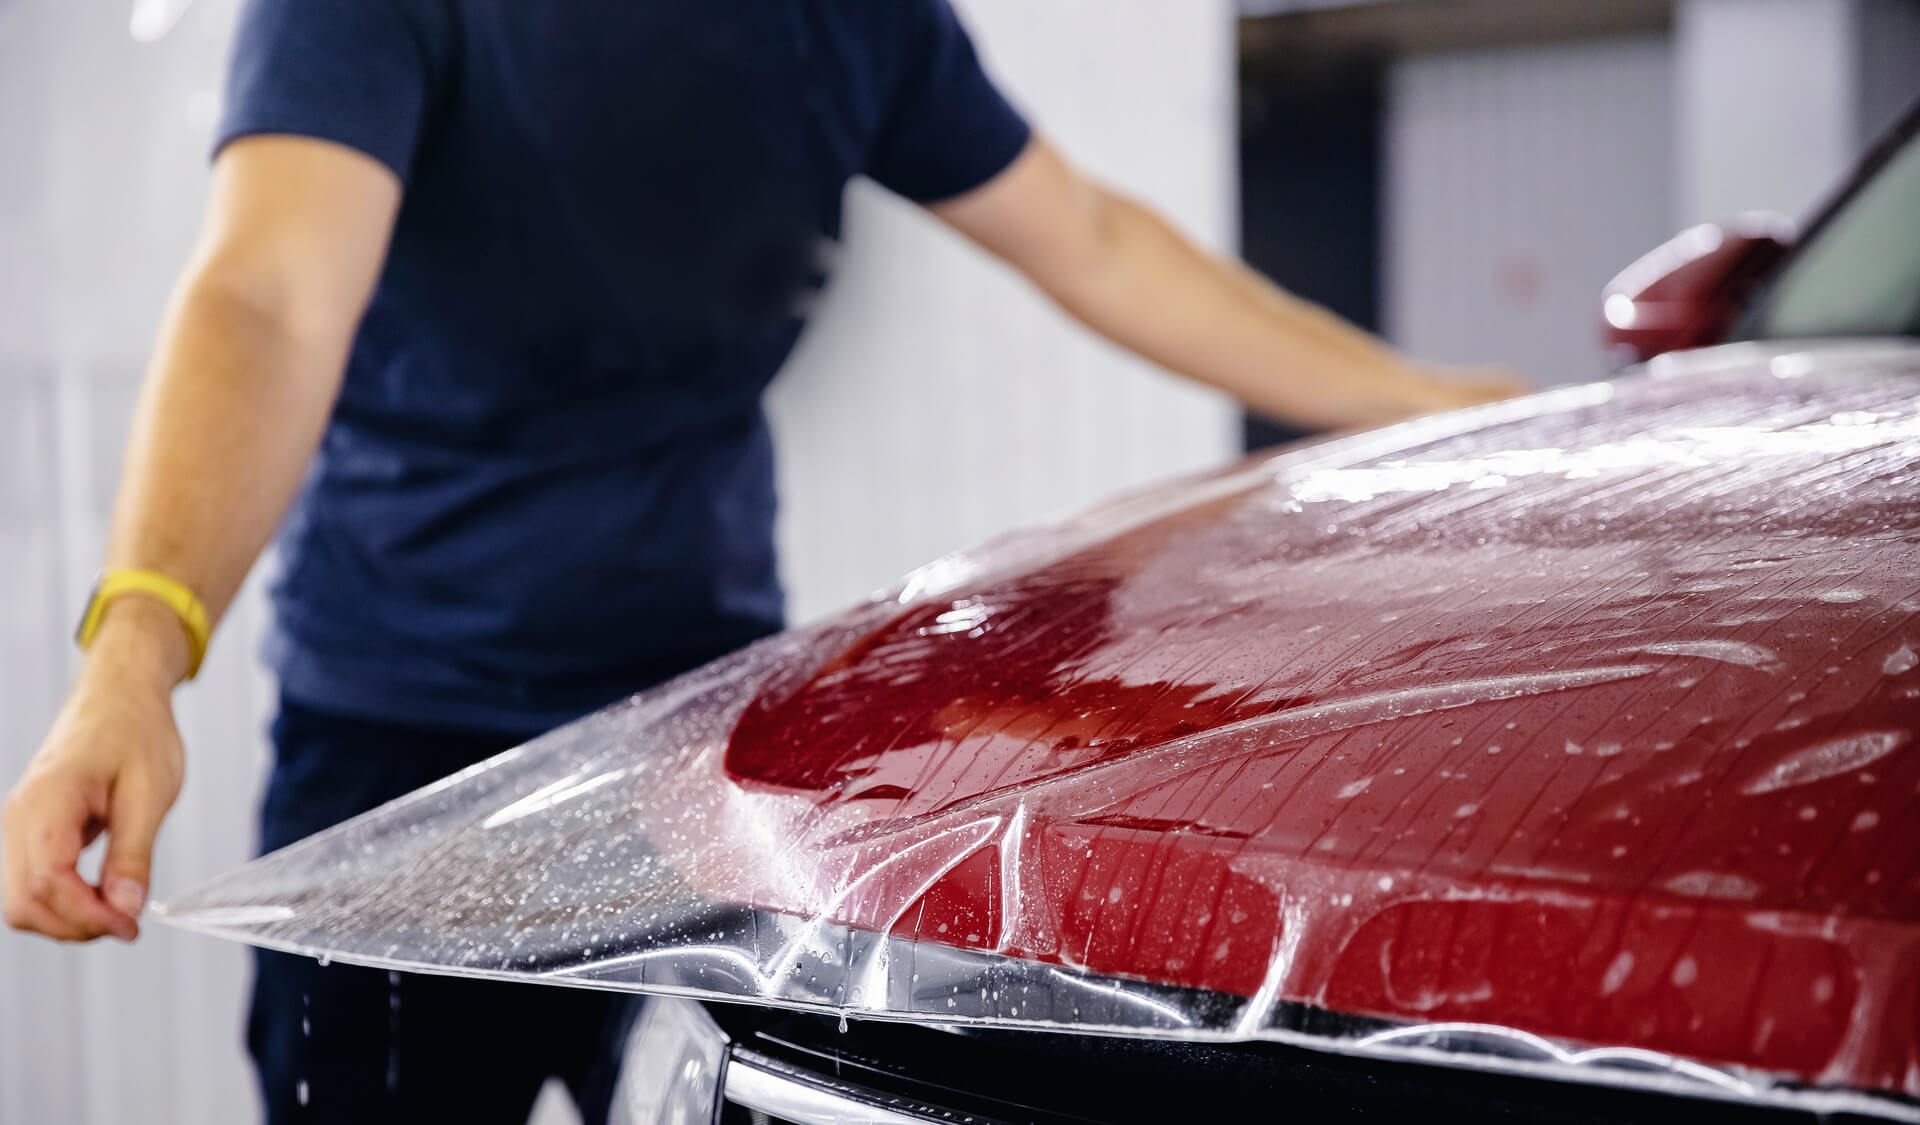
Spray slip solution generously on both the panel and the adhesive side. Don’t be stingy. You want that film to float.
Lay the film onto the wet surface. Start from one edge and work toward the opposite edge. Align one edge against a natural body line or panel gap before letting any part of the film touch the paint. Work slowly—once the adhesive contacts the surface, repositioning gets harder.
For larger panels like hoods or roofs, working with a second person is hugely helpful. One person holds and positions while the other squeegees. Trying to solo a full hood on your first attempt is how most people waste expensive film.
Don’t overstretch the film. TPU can stretch, but not infinitely. Stretching beyond 10–15% increases the risk of stretch marks, glue lines, orange peel texture, and distortion. If you’re fighting the film to reach an edge, you’re stretching too much. Relax and reposition instead.
Start squeegeeing from the center. Using your soft-edge squeegee, apply firm, even pressure and push outward toward the edges. Overlap your strokes by about 50% to ensure complete liquid evacuation. Keep the squeegee at a 30–45 degree angle to the surface—this helps slice through trapped air rather than pushing it ahead. Avoid 90-degree angles, which create squeegee lines.
Wipe your squeegee frequently with a microfiber towel. Accumulated liquid on the squeegee edge just gets pushed back onto the film.
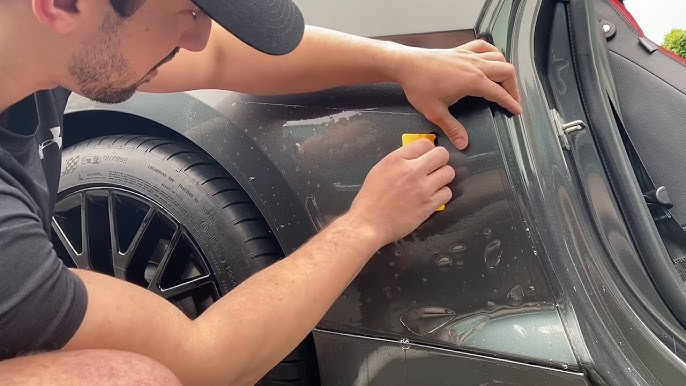
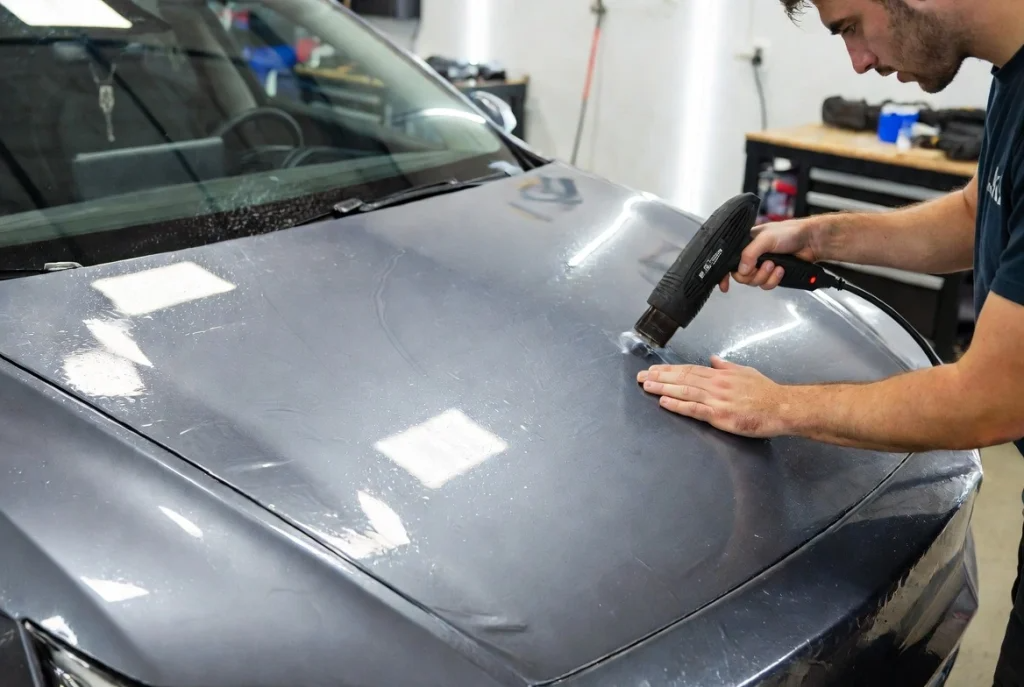
Step 7: Heat, Tuck, and Conquer Curves
Flat panels are easy. Bumpers, mirrors, and door handles are where installation gets real.
Use a heat gun (not too hot—keep it moving) to gently warm the film around complex curves. The heat softens the TPU, making it more pliable and conformable. Recommended temperature zones: 110–140°F for gentle forming, 150–180°F for stretching around door handles and tight radii. Never heat one spot for more than 3 seconds—keep the gun moving in circular motions. Overheating can yellow the film or damage the adhesive.
For edges that need wrapping around panel ends: after flushing out slip solution thoroughly, use a tack solution on the edges and apply brief heat. This activates the adhesive faster and creates a secure bond. If you have tension issues causing “fingers” or peeling back at edges, evenly spread out the film’s tension before flushing—no amount of edge flushing will fix improper tension distribution.
Wrapped edges last longer than trimmed edges. Whenever possible, wrap PPF around the edge of a panel to the underside. This creates an invisible transition and prevents dirt from collecting at film edges over time.
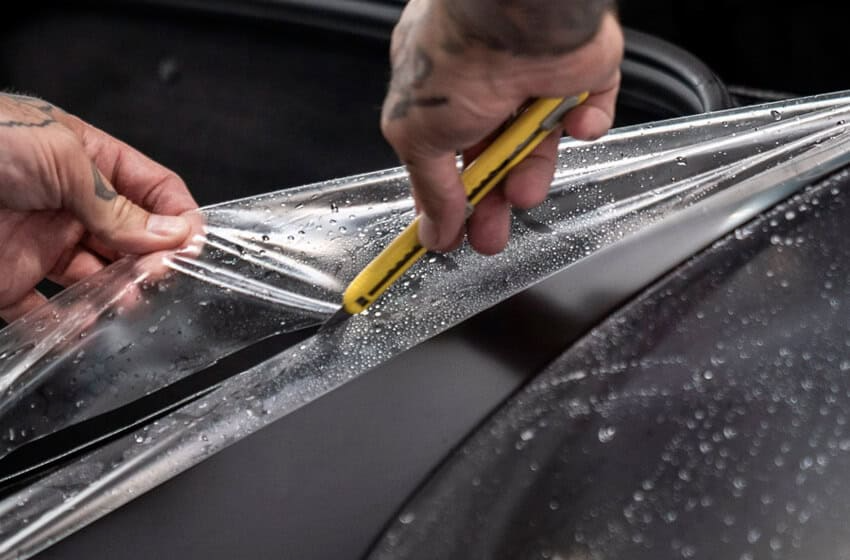
Step 8: Trimming Excess Film
Once the film is fully applied and conformed, trim the excess. Use a sharp 30-degree snap-off blade with light, steady pressure. The goal is to cut through the film without touching the paint beneath. If you’re nervous, use knifeless tape to define your cut line—it has a filament embedded that cuts the film as you pull, with zero risk to paint.
For edges that can’t be wrapped (like certain panel gaps or trim lines), trim as close to the gap as possible without going over. A flush edge collects less dirt and looks cleaner.
Replace your blade frequently. Dull blades drag, tear, or require extra pressure—all bad news for a clean finish.
Step 9: Final Inspection and Curing
Walk around the vehicle under bright light. Look for:
Trapped air bubbles (small moisture bubbles often disappear within 7–14 days)
Lifted or peeling edges
Dirt or lint trapped under the film
Visible seam lines
Any area where the film isn’t fully bonded
For small persistent bubbles (under 2mm), they usually dry out within 48 hours as moisture evaporates through the breathable TPU. For larger bubbles, gently lift the film and re-squeegee the area. For tiny pinpoint air pockets, a fine needle can release the air, then press flat with your squeegee.
Do not wash the vehicle for at least 48–72 hours after installation. The adhesive needs time to fully bond to the paint. Some manufacturers recommend waiting up to 7 days before any pressure washing. When you do wash, hand wash only with pH-neutral car shampoo and soft microfiber mitts. No automatic car washes with spinning brushes—they’ll catch and lift edges.
If you use a pressure washer, keep these rules: minimum 40-degree wide spray pattern, maximum 80 bar pressure, hold nozzle at least 30 cm away from the film, and never direct the water stream directly at film edges from a shallow angle.
Common PPF Installation Mistakes and How to Avoid Them
Let me save you from the most painful lessons I’ve seen DIYers learn the hard way.
Mistake #1: Skipping surface prep. This is the #1 cause of failed installations. Dust, wax, or oil under the film creates permanent bubbles and premature edge lift. Solution: do the full three-step prep—chemical decontamination, clay bar, IPA wipe. Every time. No shortcuts.
Mistake #2: Not using enough slip solution. If the film grabs before you’ve positioned it correctly, you’ll fight wrinkles and misalignment. Solution: spray liberally. You want the surface wet enough that the film floats visibly. More is better here.
Mistake #3: Overstretching the film. Too much tension creates stretch marks, glue lines, and orange peel texture. The film also becomes thinner in stretched areas, reducing protection. Solution: if you need to stretch more than 10–15% to reach an edge, you’ve mis-cut or misaligned. Start over rather than forcing it.
Mistake #4: Wrong squeegee technique. Starting at edges instead of the center traps air in the middle. Using too sharp an angle creates permanent lines in the film. Applying uneven pressure leaves streaks. Solution: start center, work outward, keep 30–45 degree angle, use consistent pressure.
Mistake #5: Rushing. PPF installation is not a race. Each panel deserves focused attention. Professionals take 10–14 hours for a full front-end installation. Bumpers alone can take 2–4 hours. Rushing creates mistakes that can’t be undone.
Mistake #6: Ignoring temperature. Installing in cold conditions (below 50°F/10°C) prevents proper adhesive activation. Installing in hot conditions (above 90°F/32°C) makes the film too soft and sticky, reducing your repositioning window. Work in that 65–77°F sweet spot.
Aftercare: Keeping Your PPF Looking New
A quality paint protection film properly installed should last 5–10 years with basic care. Here’s what that looks like:
First 48–72 hours: No washing. No pressure washing. No highway driving if possible (road debris can catch on unset edges).
First 7 days: Hand wash only. No automatic car washes. No waxes or sealants yet—let the adhesive fully cure.
Ongoing care: Hand wash with pH-neutral shampoo and soft microfiber. Rinse thoroughly. Dry with clean microfiber. Avoid harsh chemicals, abrasive polishes, or rubbing compounds.
Waxing: Not necessary. PPF has its own clear coat top layer. If you do wax, use a wax without dyes or abrasives.
Ceramic coating: Yes, you can apply ceramic coating over PPF. In fact, it’s common—the ceramic adds hydrophobic properties that make cleaning easier. Apply PPF first, let it cure, then ceramic coat on top.
If you notice edge lifting within the first few weeks, clean the area with isopropyl alcohol, apply tack solution, and use gentle heat to re-bond. Small edge lifts caught early are fixable.
Why Quality Film Matters—And Why Decowell Film Makes Installation Easier
Here’s the part that rarely gets discussed: not all PPF is created equal. You can follow every step perfectly, but if the film itself is poorly manufactured—weak adhesive, inconsistent thickness, low-grade TPU—the result will still disappoint.
Decowell Film stands apart because it’s engineered with professional-grade thermoplastic polyurethane (TPU) that actually makes installation easier, not harder. Here’s what that means for you:
Superior conformability. Decowell’s TPU formulation has the right balance of flexibility and tensile strength. It stretches without overstretching, conforms to complex curves without fighting back, and self-heals from light surface scratches when exposed to heat. That means fewer wrinkles, fewer stretch marks, and less frustration during application.
Optically clear with non-yellowing properties. Cheap PPF turns yellow after a few years of UV exposure. Decowell uses advanced UV inhibitors that block up to 85% of harmful rays and resist yellowing over time. Your car’s original paint color stays vibrant, not dulled by a yellowed film overlay.
Hydrophobic and stain-resistant top coat. Decowell’s top layer repels water, dirt, bird droppings, and bug splatter. Contaminants don’t bond to the surface—they bead up and roll off. That makes cleaning easier and keeps the film looking cleaner for longer.
Self-healing technology. Minor scratches and swirl marks disappear with heat from the sun, warm water, or a heat gun. Your PPF repairs itself continuously, maintaining that just-installed gloss without constant maintenance.
Precision-cut options. Decowell offers vehicle-specific pre-cut templates that eliminate guesswork. The film fits your exact panel contours out of the box—no bulk cutting, no wasted material, no alignment headaches.
Backed by real performance. When you’re investing time and money into protecting your vehicle, you want film that delivers. Decowell’s TPU construction absorbs impacts from road debris, resists chemical staining, and maintains clarity through years of exposure. It’s film you can trust because it’s film that works.
Whether you’re a professional installer looking for consistent, reliable material or a dedicated car enthusiast tackling your first DIY PPF job, Decowell Film gives you the quality foundation you need. The best installation techniques in the world can’t save bad film. Start with film that’s built to perform.
Frequently Asked Questions
Q1: Can I apply paint protection film myself, or should I hire a professional?
If you’re covering small, flat areas like headlights, door cups, or partial hood kits, DIY is absolutely doable with patience and this guide. For full front-end coverage—especially bumpers with complex curves—professional installation is strongly recommended. A full bumper takes 2–4 hours even for experienced installers. If you have a luxury or new vehicle, let a pro handle it. The cost of wasted film plus the frustration of a bad result usually isn’t worth the savings on your first attempt.
Q2: How long does paint protection film last?
With proper installation and basic care, quality TPU-based PPF like Decowell Film lasts 5–10 years. The adhesive degrades over time, but the film itself continues protecting throughout that window. Most car owners sell their vehicles every 6–8 years, so you’ll likely enjoy the protection for the entire time you own the car.
Q3: Will PPF make my car look different?
A quality clear PPF is optically transparent—it doesn’t change the appearance of your paint. You shouldn’t be able to tell it’s there except for the edge lines if you look very closely. Gloss finishes actually look slightly deeper and richer under quality PPF. Matte PPF preserves matte paint finishes without adding gloss.
Q4: Can I put ceramic coating over paint protection film?
Yes. In fact, it’s a popular combination in professional detailing. Apply PPF first, let it cure fully (48–72 hours minimum), then apply ceramic coating on top. The ceramic adds hydrophobic properties and makes cleaning even easier. Do NOT apply ceramic coating first—PPF won’t bond properly to a ceramic-coated surface.
Q5: How soon after PPF installation can I drive my car?
You can drive immediately after installation, but avoid highway speeds for the first 24 hours if possible. High-speed airflow can catch unset edges. Definitely avoid pressure washing or automatic car washes for at least 72 hours. Hand wash only for the first week.
Q6: What’s the difference between PPF and ceramic coating?
PPF is a physical film (typically 6–12 mils thick) that absorbs impacts—rock chips, scratches, abrasion. Ceramic coating is a liquid-applied chemical layer (microscopic thickness) that adds hydrophobic properties and chemical resistance but offers zero impact protection. They’re complementary products, not substitutes. The ideal setup: PPF on high-impact areas, ceramic coating over everything.
Q7: Does PPF cover the entire car?
It can. Full-body coverage is becoming more common. But most owners focus on high-impact zones: front bumper, full hood, fenders, side mirrors, door edges, rear bumper deck, and door cups. These areas take 90% of road debris impacts. Full-body coverage is excellent but significantly more expensive.
Q8: Will small bubbles under the PPF disappear on their own?
Moisture bubbles (from slip solution) typically dry out within 7–14 days. Air bubbles (from trapped gas) won’t disappear on their own. For air bubbles smaller than 2mm, you can sometimes ignore them—they’re cosmetic only. For larger air bubbles, gently lift the film and re-squeegee. For stubborn pinpoint bubbles, a fine needle can release the air, then press flat.
Q9: Does PPF increase resale value?
Yes. Factory paint in excellent condition is one of the strongest selling points for any used vehicle. Buyers will pay more for a car with flawless original paint. PPF preserves that paint, so the car looks newer longer. It’s not a dollar-for-dollar return, but it absolutely helps your resale position.
Q10: Where can I buy Decowell Film?
Decowell Film is available through authorized distributors and select online retailers. Visit the official Decowell website or contact their sales team directly for product specifications, pricing, and installation support.
Final Thoughts
How to apply paint protection film comes down to three things: meticulous preparation, quality materials, and patient execution. There’s no magic trick. There’s no shortcut. But when you get it right—when that film goes down smooth, conforms to every curve, and disappears into the paint—you’ll know why PPF has become the gold standard for vehicle paint protection.
Start with film you can trust. Follow the steps. Take your time. And enjoy driving without wincing every time you hear a rock bounce off your hood.
Ready to protect your ride? Decowell Film delivers professional-grade TPU protection engineered for real-world performance. Contact us today for product information, installation support, or to find an authorized Decowell installer near you. Your paint deserves the best—give it Decowell.